Showing posts with label Sewing. Show all posts

Tuesday, July 1, 2014

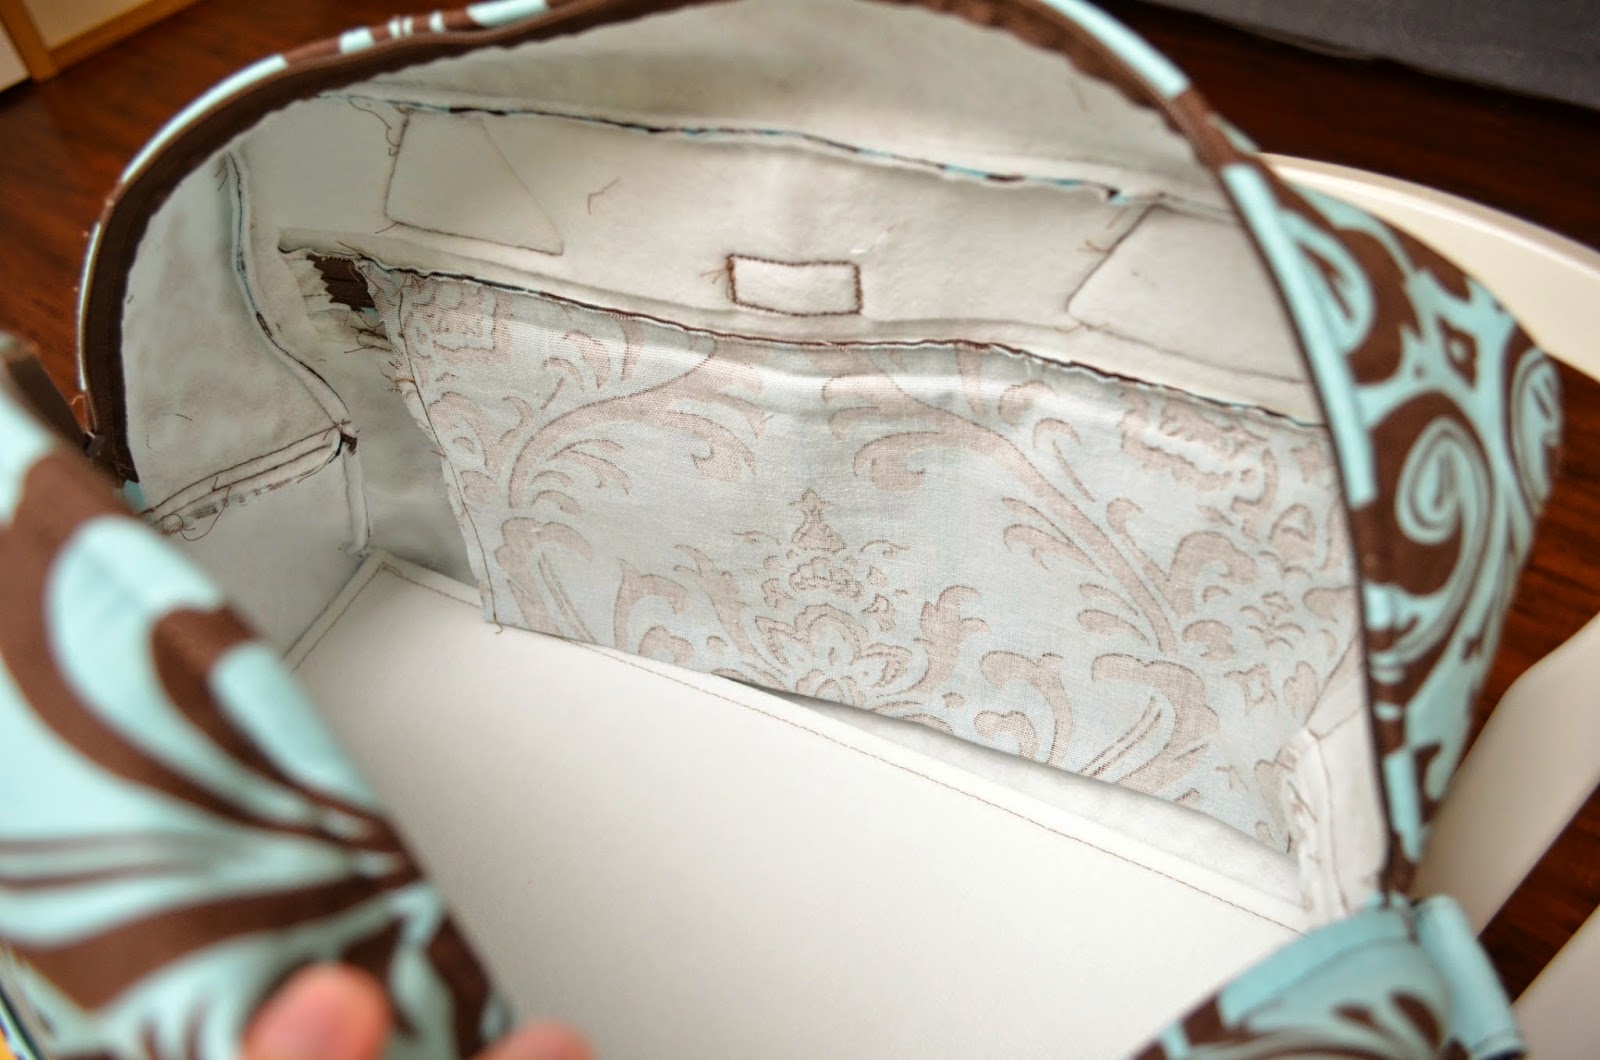
The Secret Mess of Bags and Life

Today, I was thinking about sewing, as I often do, but instead of my normal sewing thoughts (what project can I make next? which fabric should I choose? when can I justify my next Girl Charlee order?), I was thinking about the sewing process, particularly the inside of the bags I have sewn. Don't ask me how I got on that thought! I have no idea. But this led me to thinking about how hidden between the beautiful finished lining and exterior of a bag is a mess.....a mess of white interfacing, thread pieces, seam allowances,


stitching lines, zipper tape, and the wrong side of a zipper pocket.


No one but the sewer usually sees this concealed mess. Mostly everyone else just sees the finished product, all neat and tidy, picture perfect!


But this unseen, unsung mess is what gives the outward picture its perfect form and beauty. Without it, the final product would not be there. This is kind of like people and life. So many people just see the outward, put-together person, and not the inner, tangled threads that have shaped and formed that visible persona. Often times, we don't take the time, think about, or even care to know what lies behind the surface, but perhaps if we could see, we would appreciate the outer all the more.

Who would have guessed that thoughts of sewing and bags could be so philosophical!?!? ;)

*Bag pictured is the Stella Weekender by Swoon Sewing Patterns (affiliate link)!

Monday, November 11, 2013

A Stellar Announcement

*This blog post includes affiliate links

Yesterday,  Swoon Sewing Patterns released yet another great pattern to its already marvelous collection of PDF sewing patterns! Let's all give a warm welcome to the Stella Weekender Bag ! As many of you have probably already guessed (due to many blog posts featuring a Swoon project), I really am in love with all things Swoon! This pattern is no exception! I became a Swoon pattern tester about a month ago, my first tester project being the little girl's cardigan. Stella, however, is my first bag to test, so she is extra special!

So without further ado, let me introduce you to Stella (well at least my version of Stella)!

Front Pic

Back Pic

Isn't she amazing??? The evening I finished her, I just sat and stared, hardly believing I had actually made such a bag! Trust me, it wasn't like I just snapped my fingers and presto, there she was! This girl takes work, but as you can see, the end result is kind of worth all that hard work. :)

So what makes Stella so special? Well let's put her under the microscope. Stella is full of some serious interfacing and stabilizer! Her exterior pieces are reinforced with fleece, while her lining pieces are reinforced with a lightweight interfacing. Her handles and bottom are reinforced with Peltex, a seriously wicked stabilizer. Before attaching the lining to the exterior part, I actually snapped a picture of her insides. Poor Stella would be so mortified. ;)


She definitely has plenty of body! Can I be biased and say that my stitching looks pretty darn good, even on the inside?!?!?! :)

On top of excellent structure and form, this girl is fully lined.  

I LOVE the chocolate polka dots!

She has carrying options. If your hands need a rest, throw her over your shoulder with her removable strap. I added a nice shoulder pad to my Stella, which I purchased from Strapworks.com. This is also where I purchased her strap loops and swivel snaps. Strapworks is the place to buy bag hardware (and straps of course)! Seriously, you won't be able to find better deals!


Another fabulous feature of Stella is all her room! She definitely has enough compartments to hold all you need for a quick weekend getaway or the necessary essentials to carry on your flight in case the worst happens: your luggage fails to make it to your vacation destination. Stella is also the perfect size for a roomy diaper bag. Who says diaper bags can't have style??? I packed my Stella with some perfect weekender/travel essentials just so you could see how roomy this girl is.


Speaking of room and compartments, does this girl have pockets!!! Stella is the queen of pockets! She has pockets on the outside and pockets on the inside.

She has an exterior zipper pocket,


cargo pockets (my first time making!!!),


open pockets (inside and outside),

Inside Open Pockets

Outside Open Pockets

and even side pockets.


After such an impressive resume, are you really that surprised by her name? She really is out of this world great!

Now, I must be honest with you. This bag is not a simple project. If you are looking for a quick afternoon project, Stella is NOT your girl.  Stella takes time, patience, and determination. My suggestion is to tackle Stella in parts. Spend an afternoon (or two) cutting out all her pieces, another fusing all that interfacing to the fabric, and another (or two) putting her together. Take your time and enjoy the project, keeping a mental picture of the beautiful finished project in your mind. And honestly, if you can get past the cutting and fusing, you've accomplished over half the battle. Putting her together is the fun part! Don't be intimidated! I have only been sewing for a little over a year and look at my Stella! The instructions to this pattern are so clear and detailed, and the accompanying illustrations are an added bonus! You really can do this!

So what are you waiting for??? Go visit Swoon Sewing Patterns today and pick up Stella ! Make yourself a weekender bag that everyone will be talking about! Make one for someone on your Christmas list!

Material Credits:

Exterior fabric (Home Decor)- Premier Prints Traditions French Blue/Brown (purchased on fabric.com)
Interior/lining fabric (Quilting Cotton)- Spot On II Polka Dots White/Brown (purchased on fabric.com 

Pellon Products-
Pellon 971F (Fleece)
Pellon 911FF (Lightweight interfacing)
Peltex 71F (Stabilizer)

Hardware and Notions-
Magnetic snaps (cargo pocket closures)-Jo-Ann's 
Zippers-purchased from http://www.etsy.com/shop/zipit
Strap loops, swivel snaps, and shoulder pad-purchased from strapworks.com


Wednesday, October 23, 2013

The Long Awaited, Much Anticipated Rosie!!

*This blog post includes affiliate links

So you know how I was hopeful Monday that I would have pics of my completed Rosie up? Alas, our best laid plans do not always come to fruition. But better late than never! :) Here she is....

Just Hangin' Around

Do you see what I see? Let's play a game! I spy with my little eye something that is pink...green...or sometimes blue! Did you guess???? If you said owls, you won! Haha remember when I talked about my newest owl fad here??? I did warn you. ;)

Just Posing With the Flowers

This fabric combo (colorful owls/sparkly denim) is probably more teen friendly than sophisticated young adult... (who is calling who sophisticated???) Well good thing I am a fun young adult.... Although I am almost 28, practically pushing 30, so does that mean I am not a young adult anymore??? Ah! Please, let's not think about that anymore than we have too....

Just Posing alone....what a poser!! ;)
Look at how perfect that top stitching looks??? And those curves!! Why they are practically perfect! Let me have my bragging moment, for now...

Just Posing with the Top Down

"Please excuse my slightly wrinkled look! I have just been turned outside in or right side out! And the person sewing me only gave me a 4-inch gap to slip through, instead of the recommended 5-inch," says disgruntled purse.


Just showing off my inside zipper.

Speaking of zippers..... Can I say NIGHTMARE???? Ugh! So yes, the inside zipper looks pretty good right? Well the outside zipper is non-existent!!! You know why??? Because we had a falling out after the third time of ripping out stitches! This should not in anyway reflect negatively on the quality of this lovely pattern! Rather, it is a reflection of my poor choice to use this STRETCH denim fabric, STRETCH being the key word. First, I have never sewn with denim and this was pretty thick stuff! Secondly, the stretching quality is horrible when trying to install a zipper. The rectangular cutout kept stretching and because the fabric was so thick (plus the fleece), it was difficult to get the cut pieces to fold evenly. Let's just say, I learned my lesson about using stretch fabric for purse making. It just doesn't work or I am just that bad. Seriously, though, I always struggle somewhat with keeping a zipper aligned and not having my rectangle look slightly off. Any advice from you zipper pros? How do you keep zippers from moving? Any tricks?

So, you are probably wondering what happened to the outside zipper pocket, since, yes, I had already cut it out. I could have just cut another piece but I was stubborn and had already cut the pocket pieces. So.....I just stitched around the pocket square without the zipper and I attached the pocket pieces the same way it says to with the zipper, except on the remaining part of the raw edges of the cutout pocket edges. That probably sounds confusing, so I will just show you. Just don't laugh.

Just Posing with my Peeking Pocket

Okay, this picture even shows how my rectangle slot is kind of wonky...Stretch fabric people, stretch fabric! But on the bright side, I sort of thought the peeking owls were cute... :) Haha, a lesson well learned.

Despite my zipper trials, I love my first little Rosie! It has character! I can't wait to make my next one! I already have my (non-stretch) fabric choice picked out! The fabric choice will be less thick (because this denim was too thick) and more elegant for a sophisticated young adult....or middle-aged adult...No, I am too young for that! ;)

As to my review of this pattern, let me just say the Rosie Crossbody Bag is wonderful, like every Swoon Sewing Pattern I have tried so far!!! The directions are so clear and I love how the wonderful designer divides the process into sections of the bag, rather than every little step. Sometimes, it can feel so overwhelming to look at 21-30 steps! It is so much more comforting to see instructions broken into....say 9 steps! Much more manageable and psychologically friendlier to look at. :) The accompanying illustrations are also so helpful, especially for those of you that are more visual or for those of you that are doing something for the first time. For me, it was attaching a strap slide. The diagram was so easy to follow! This bag is perfect; smaller than the  Eleanor Slouchy Hobo bag which I showed you a picture of in this post, making it a perfect purse for the times when you just want something smaller to carry all your junk....I mean essentials in. ;) Don't get me wrong; it is still nice and roomy! It also has a different style...more structured, less slouchy. Seriously, every girl needs a different purse to compliment her different styles or moods. I love the magnetic closure and the flap! I was really worried about getting the contrasting flap piece perfectly centered but there was no need to worry! I just followed the directions to a T and it came out perfectly! I highly recommend this little lady!!!

Here is one last pic....forgive my unsophisticated dress.


Well that's a Rosie Wrap! :)

Monday, October 21, 2013

Here and Gone

*This blog post includes affiliate links

Alas....my week and a half break from school has come and gone. I had a long list of all the things I wanted to get done over break, probably a ridiculously long list for such a short time. Still, I got all the things I absolutely needed to get done and had time to do some of the things I wanted to do, like sew and sew and sew. :) My last class started out slow, but then grew to be fairly intense towards the final month of it. During that month, I hardly did any sewing. I am pleased to say that after looking ahead at the whole schedule for my new course, I believe I will be able to do more sewing this term than last, which is good since Christmas is getting closer! AH!!!! Maybe I am not as ahead as I thought. Oh well. Today is a beautiful fall day, sunny and crisp! I have a good start on my class for the week and I am going to sew up my first Rosie Crossbody Bag by Swoon Sewing Patterns! The hardware I needed arrived last Friday and I finished cutting the last piece of fabric this morning (the strap). All of the pieces are interfaced, so it is time to dive in! Maybe I will even post a pic today, if I finish it!!! Stay posted!

Sunday, October 20, 2013

It's a secret...shhhh....Not anymore!!

*This blog post includes affiliate links

Okay, so remember that secret I mentioned a couple posts back??? Well I can now reveal all!  Swoon Sewing Patterns (the former Paco Bean Patterns) has released a new pattern: the Scarf Neck Cardigan for Girls !!!! Yes! I know you are all jumping up and down and clapping! Please take a moment if you need to compose yourself... ;)

I was privileged to get to test this pattern out and it is amazing, just like the women's version, only it is even faster to sew due to the smaller size. Also, it only takes half the amount of fabric. In fact, I think I only used about 1/2 a yard to make the smallest size, which is 3/4. Speaking of sizes, this pattern includes the following size options: 3/4, 5/6, 7/8, and 9/10.

Want to see a picture of the one I made for my niece??? I'll just pretend you said yes, because of course you do! ;)


See??? The same great style in miniature size. Now the little ladies in our lives won't be left out! Here is a picture of my little three year old niece in the 3/4 size.

Yes, you can make out a little pout! Smiling or pouting, she is adorable! :) Well don't stand here waiting. Head on over to Swoon Sewing Patterns and see the many wonderful creations this pattern has already inspired! Then put it in your cart and get to work! :)

Wednesday, October 16, 2013

Weekend Project

Just thought I would share some snap shots of the project (or projects) I completed this weekend! My mom has been asking me to make some dresses for her that she could give to her two neighbor girls for their upcoming birthdays. So I let her browse through my collect of patterns, and she chose Merideth's Center Ruffle Peasant Dress by Create Kids Couture. Obviously, my mom has good taste. ;) I had not made this dress before, so I was excited to get to work. Here is a glimpse of the completed dresses.


This pattern was so easy and quick! All of the pieces are just rectangles, so it is also very fabric-economical (is that even a word???). I would have completed both of these dresses in one afternoon; however, I realized I didn't have the right size of elastic for the neck casing. So, yes, I HAD to make a run to Jo-Ann's on Monday. (Bonus: Red Tag Clearance was an additional 50% off that day!!!!) The most time consuming part of this project is gathering and pinning the ruffles to lay just right on the front. There is shirring on the sleeves, but it really is easy. And this is only my second time to shirr! I will definitely be making more of these dresses.

Close-up of shirring.


These two pictures show the actual colors of the fabric much better! As you can see, I also made some little hair bows to match. You might remember me talking about them in this post. These really are so easy to make! Here is the link to the tutorial I used.

Well that was my big project over the weekend! Oh and I have already completed another project this week, but it is a secret. It is my first project as a tester! Let's just say, once it comes out, you will be very excited!!!! Don't worry, all will be revealed soon enough! ;)


Thursday, October 10, 2013

Oops! I did it again! ;)

*This blog post includes affiliate links

Yes, I did it again! I made another cardigan with the wonderful Paco Bean Scarf Neck Cardigan pattern! This pattern is as amazing the second time around as it was the first!

Here are a couple pics of my new charcoal grey Scarf Neck Cardigan!


For this second cardigan, I did a few things differently. First, I used a knit that was a little thicker. It is probably considered a light to med weight knit. I'm not really sure about all the info, since this fabric was given to me. I love it, though, whatever it is. It is so soft and comfy! It drapes just as nicely as the other knit.

Second, I made this one with the shorter sleeves. I was going to do the long sleeves, but as I started cutting everything out, I quickly realized it would be cutting it close (literally!). So I went with the shorter sleeves. I am so glad I did! I love them!

Thirdly, I did not hem the bottom or scarf neck edge this time. Yes, I was being a little lazy, but hey it looks so good without a hem. And now I have tried it both ways.


Oh and lastly, I made a small this time, instead of a medium. It fits great. This knit is a little stretchier than the other. I think I could have made the other in the small and still been good, though, but when in doubt, it is best to go the safer route. My recommendation if you are in-between sizes or the size you wear depends on the brand, I would go with the bigger size for knits that have minimal stretch and the smaller size for knits that have a greater amount of stretch.

Already plotting my next one....I wonder how many I can make before it is considered excessive??? haha ;)

Wednesday, October 9, 2013

Half-Pint Purse

So two weeks ago, Create Kids Couture (CKC) released a FREE pattern on their blog for a doll size purse. It is adorable! With CKC's trademark ruffles!! So cute! In this post, they also refer back to another FREE pattern they had released on their blog in April for the same purse but in little girl size. Of course, I clicked on the link to see this post, knowing I needed to make the little girl size ruffle purse for my niece. Well two weeks later, I had the time to do just that. I thought I would share some pics of my little creation, and a little tip for using fat quarters to make this purse. :)

Here is a picture of my fabric choices and pattern pieces all ready to go! These fabrics came in one of those fat quarter bundles from Jo-Ann's. For some reason, I just really love owls right now. They are just so cute. My niece was wearing the most adorable ruffle shirt the other day that had a little owl on it. And today, at my great-uncle's memorial service, one of my little second cousins was wearing the same shirt! Now that I love them, I see them on everything! Were they always there, or am I just now noticing them??? haha


Here is a picture of my finished little girl size purse, which really is just the perfect size for a little lady.


I kind of think it is adorable! Maybe I am biased. :) Look how it stands up so nicely! Let's give a shout-out to the nice interfacing I used! By the way, this was my first time using Pellon 987.

Here is a pic of the inside.


I made a little rectangular pocket to add to the inside for a couple of reasons. First, I knew my niece would love a little pocket. Second, I just thought it would add a pop of contrasting color to the inside. I made the pocket with the same fabric I used for the ruffles. Oh and you even get a little glimpse of my labels, which were made by Sewnique Boutique!

Anyways on to my little trick, which probably isn't a trick and is probably something everyone knows. But just in case someone out there is newer to sewing like me, this may seem like a cool trick too! So the pattern calls for 1/3 of a yard of fabric for the outer and lining. However, if you cut the purse bottom out just a little differently, you can use those fat quarters. Instead of cutting this piece on the fold, you are going to cut two separate pieces, adding 3/8 of an inch to each piece. (Add the 3/8 of an inch to the edge where the fold would have been.) With right sides together and the edges (where the fold would have been) matched up, sew down the edge using a 3/8 inch seam allowance. Now you will have one piece and it will be the same length as it should have been originally, since we accounted for the seam allowance when we cut the pieces out. Repeat this with the purse bottom for the lining. Here is a picture of the bottom seam where the pieces are joined.


You know what else is great about this method??? If you are using directional fabric, your designs (my owls) will be facing upright on each side. So neither of the owls will be standing on their heads. ;) I have to say, I learned this trick from an amazing Paco Bean pattern!!! (Every Paco Bean Pattern is amazing though!) And by the way, if you want to make yourself a big girl purse, check out Paco Bean Patterns! You won't regret it!

Well this is my take on CKC's Child Ruffle Purse! Go check out their pattern and make one for a little lady in your life! And definitely check out their pdf patterns at the Create Kids Couture Store! I have bought several of their patterns and they are so easy to follow. I learn something new every time.

Thursday, October 3, 2013

Paco Bean Cardigan!!!

*This post contains affiliate links.

So I cannot remember when I first discovered Paco Bean, but I believe I bought my first Paco Bean pattern this summer around the beginning of August. Unfortunately, at the time, I was knee deep in two grad courses. It wasn't until last month that I was able to actually make something from one of the Paco Bean patterns I had accumulated. The first item I made was the Eleanor Slouchy Hobo bag, which I blogged about in this post. I fell in LOVE with this pattern and the final product! I felt like I had made a professional purse (perhaps that is because it LOOKS so professional??)! :) I have gotten many compliments on this lovely bag.

Now this week, once again, I have fallen in LOVE with another Paco Bean pattern: the Scarf Neck Cardigan! This is the newest Paco Bean pattern available and it is a beauty!! Once you make one, you will need to make at least half a dozen more.... :) I think that is reasonable...

Take a look at my little beauty!

Front pic!
Isn't it gorgeous??? I love the way it fits! The scarf neck drapes so perfectly!  I love everything about the dimensions of this pattern. I love all the curves and points, the princess seams, etc.

Side pic of front points...love them! 

Close-up of princess seams...first time making them!
As for the pattern, the instructions are so easy to follow! There are instructions for finishing your seams which a french seam or you can use your serger or you don't have to finish the seams at all. I used my serger to make this one. Seriously, I love my serger when it comes to sewing with knits! I hemmed the sleeves, bottom edge, and the raw edges of the scarf neck using a double-pointed needle. You really don't have to hem anything if you like the raw edged look, and it does make this an even quicker project. All of the pattern pieces fit together perfectly. From the look of the cardigan, it seems like a complicated project, but really that's the cool secret! It isn't! But hey, go ahead and let your admirers be impressed with your sewing skills.

For this cardigan, I used a very light weight knit. It is a light blue Jersey knit with burnout Damask print. I bought this on fabric.com for $2.99 a yard! Pretty good steal! Oh and fyi, this is the medium size of the cardigan.....I think I could maybe get away with the small, which I might try next time. This particular knit wasn't super stretchy. Plus I wanted room to be able to layer over a long sleeve shirt since it is so thin and I live in the cold Northwest.

I have only one warning about this pattern: it is addicting! You will want to make many more, which means you might need to shop for some new knit fabric, which means your husband may let out a long sigh, which means you will need to show him the great prices you can find at Girl Charlee and fabric.com. ;) At least, that is my plan.

So I will admit I now own almost all of the Paco Bean patterns available to date, but unfortunately, grad school is still keeping me busy. I do, however, have a week break coming up and I can't wait to make another Paco Bean bag.....perhaps the Dorothy Day Tripper or the Rosie Crossbody Bag???? Decisions decisions!!! Of course, the easiest solution would be to make them both. :) Stay posted....hopefully you will see one of each in the near future....and another scarf neck cardigan or two or three....or... ;)

One last pic....I just love how it lays...

Wednesday, October 2, 2013

To the Rescue.....

This past week, I made superhero capes for my cousin's two boys. The oldest, who is four, loves Batman! Both he and the youngest, who is almost two, spent many hours this summer with blankets or towels tied around their necks for ready-made capes. A superhero must be ready at all times, and a really good superhero knows how to improvise. :)

I was assigned the task of creating their official capes as the result of a facebook picture of the superheros in their ready-made blanket capes. Two of my aunts commented on the picture asking if I could make them capes due to my newly found sewing skills. When I saw the comments, I went to work on Google, knowing their must be a cape tutorial somewhere out there. Sure enough, I was not disappointed. I found this amazing cape tutorial and FREE pattern by Thread Riding Hood. It was the perfect find! I loved the idea of using the superman logo so I could put the boys' letters of their first names on the back. Like I said, the oldest loves batman, so I came up with a compromise. I used a black and yellow color scheme for both the cape and logo, creating the batman effect, while using the superman logo. Take a look at how they turned out.

The older superhero's cape

The younger superhero's cape
I used broadcloth to make these. The black fabric is this premium broadcloth that I bought at fabric.com for $3.98 a yard. I was very impressed with the quality of this fabric. The yellow fabric is this cotton blend broadcloth that I also bought at fabric.com for $2.98 a yard. I also purchased half a yard of this Rainbow Felt in both the black and yellow, which was way more than I needed. But I like having some felt on hand. 

I followed the tutorial exactly. The only thing I modified was the length and width of the cape. My aunt wanted the capes to reach their lower calves, so I just added a couple of inches to the length and I added about an 1inch to the width.

For the logo, I googled the superman logo and then traced it and made it a little bigger. I drew the letters myself by looking at some examples online.

I think they turned out great! I can't wait to give them to my little cousins. Anyways, if you have some superheroes in need of some official capes, be sure and check out Thread Ridding Hood's tutorial here.

Tuesday, September 24, 2013

Hannah's Third Birthday

If you remember, I started this blog about a year ago, and one of my first posts was about the Ariel dress I made for my niece Hannah's second birthday. I smile when I look back and remember how everything about sewing was still new if not foreign to me. :) I remember being so proud that I learned to gather, hem, and install an invisible zipper with that Ariel dress.

Here we are now, one year later and I have branched out some and learned a thing or two more about sewing. And since then, I have discovered pdf patters, my new addiction and my husband's new nightmare. ;) (Aw...he is a great sport!) So this year, I did not make the dress that my niece wore to her party. Instead, I spent my time making her gifts. I can't begin to say how pleased I am with how everything turned out and how well I managed my time. I am usually a procrastinator, but this time I had all of my gifts completed by last Thursday and her party was Saturday! Pretty good for me, since I am usually still finishing up some detail the day of..... :)

I wanted to share with you the gifts I made for my niece and give a shout out to one of my favorite pdf pattern makers, Peek-a-Boo Patterns!!!

Let's start with the gift I made using one of my newest favorite patterns by Peek-a-Book Patterns!

Sisters' Matching Pullovers!!!

These adorable matching pullovers were made using the Varsity Cowl Neck Pullover pattern, which you can purchase here. I had to make Hannah and her little sister matching " I love Grandma" pullovers! I am sure you can tell from the picture that I used fleece for this project, but this pullover can also be made using knit fabric. I seriously love!!!! this pattern! They turned out SO adorable. And quite honestly it was one of the easiest clothing projects I have made. The trickiest part of this pattern is the neckline where the two pieces of the collar overlap, but the pattern is very detailed and does an excellent job walking you through this step. There is NO hemming, which I loved! Seriously, I was able to cut everything out for both of these patterns and have them finished sewing in one afternoon sitting. I used my serger, which worked great. Obviously, I highly recommend this pattern and any pattern by Peek-a-Boo patterns! I have purchased so many of her great patterns, and Thrifty Thursday is a day to remember! Check out her blog to learn what Thrifty Thursday is all about!

Next is gift number two, the pink hair bows! 

Aren't they beautiful?

So beautiful, we need another angle, right?


This was my first attempt at real hair bows. Using this amazing tutorial from Make It & Love It, I was easily able to make these adorable clips. You will be amazed at how easy it is to make these very complicated looking bows. She also provides an excellent solution for keeping these bows from slipping from those baby-fine locks of hair. I made these little bows from start to finish in about two hours, but I am sure with practice, they could be made faster. Just watch out for that hot glue! My fingers were a little sore afterwards.

On to gift number three,  the beautiful Every Little Thing Dress. This pattern is by Shwin Designs and can be purchased here. Check out the little beauty I made using Michael Miller fabric.

Isn't it sweet?
 I just love the big bow in the center. This dress may look complicated but it is an excellent dress for confident beginners. The scariest part is making the button holes. I also made some cute little matching bow hair ties using this tutorial and free pattern!  Here is a close up of these beauties.


Okay on to gift number four. I must say I have saved this for last because it was probably my most time consuming project, mainly because I spent a lot of time searching for the perfect pattern, only to find it was right under my nose the whole time and FREE! My niece loves to play doctor/nurse, so this year my parents bought her a doctor's kit for her birthday. My mom and I were talking one day and I said something about how fun it would be to make her a nurse's outfit. Of course, my mom was all about that. I started doing some research and stumbled upon this blog post. I was so excited! I had never heard of Nurse Nancy, but apparently it is a Little Golden Book classic! Of course, I immediately looked on Amazon.com to see if there was anyway this book was available and it was!!! It was also very inexpensive! Only $3.59 and Prime shipping! I ordered it right away and set to work using ikat bag's free pattern for Nurse Nancy's hat. She didn't have a pattern for the apron, so I set out to find a pattern that looked like Nurse Nancy's apron. After lots of searching and no luck, I suddenly remembered that 5Berries had recently offered a free apron pattern and tutorial on their blog. I went to check it out here and thought, "With a few modifications, this could work!" And it did!!!!

A perfect match!

As you can tell, I left off the ruffles and added pockets and the blue and white medic symbol identical to Nurse Nancy's.

Back view
I also lengthened the neck straps and made them skinnier, because I wanted the apron to fit just like Nancy's. I attached the neck straps to the waist straps about an inch and a half past where the skirt of the apron ends. It worked perfectly! I cannot tell you how pleased I was with how this project turned out! I am still timid when it comes to branching out from a pattern. I like to be able to just follow everything step-by-step, but my brave endeavor paid off. I think my little Nurse Hannah will be adorable in her uniform. :)

And here is one final glimpse of the gifts just before getting wrapped.

All together!
Oh I almost forgot, after my new found bow making confidence, thanks to Make It & Love It's blog tutorial, I also made some other bow clips (displayed at the bottom right). For these, I used this tutorial from CKC's blog, another of my favorite children's pdf pattern makers.

Well that's all folks! Hope you enjoyed a little glimpse of my sewing endeavors from the past two weeks. Maybe you will be inspired to make something for the little girls in your lives. :)


Wednesday, August 21, 2013

A Blessed Day

So today has been a great day for many reasons! First, I got 100% on my Educational Philosophy paper, which was 20% of my grade for one of my grad classes that just ended Sunday. This was the last grade I was waiting to receive for this term. :)

Then the next great thing was I won my very first sewing contest! It was a pattern naming contest for Ellie Inspired! My name suggestion was chosen for her latest pattern Texas Rose!!! This means I got the pattern for free! It is adorable!!! I am planning on making it for my oldest niece's third birthday next month. Right now, you can get the pattern at a discounted price, so what are you waiting for??? Go get it!

http://www.etsy.com/listing/160049272/sewalong-shirt-dress-pants-girls-pattern

The third great thing about today was the fact that I finished my beautiful new Eleanor Slouchy Hobo bag. This beautiful pattern is from Paco Bean and I highly recommend it! Here is a link to my review of the bag and some pictures of the completed beauty. Check it out! No, don't just check it out! Buy the pattern and make one for yourself, so you can be as pleased as I am with my new beautiful bag! I can't wait to make another one!!!

Okay I will post a picture here too! Just because it is beautiful enough to look at twice! :)


P. S. Did I mention this was my reward for all my hard work the last 8 weeks of this past term??? ;)

Tuesday, May 7, 2013

Baggin' It Up!

So about a little over a month ago, I really got into purse making. I did a lot of research on purse making, which is when I really started to learn about interfacing. Anyone that knows interfacing knows that there are SO very many different kinds, from fusible to sew-in, from light to ultra firm. Then there is fusible fleece. Trying to sift through all the information that is out there in tutorials and websites is very overwhelming. I finally discovered some valuable sites and information, and after this I ordered a bunch of interfacing and purse necessities from Jo-Ann's. When the order arrived, I felt like it was Christmas and my birthday all in one.

Beautiful isn't it???
I just wanted to bask in the beauty of all that interfacing and magnetic snaps. And the book that I got is great! Love it. So informative and well written. Check it out here. Also, since this purchase, I discovered the wonderful michellpatterns! Not only are her patterns amazing, she also has amazing advice on interfacing and many other sewing tips and techniques. Every pattern I have bought from her has not me some new sewing skill. Each pattern is like a sewing lesson. She is amazing. Be sure to check her out. Once I have more experience with interfacing I will have to share what I have learned and what are my favorites. For now, I recommend resources like michellpatterns and Lisa Lam, the author of The Bag Making Bible. Here is a link to her blog and specifically, a post on interfacing bags. Hope this helps any newbie interfacers like myself. Yes, I made that word up, I think. :) Happy Interfacing!

Sunday, May 5, 2013

Skirting around....

So I made this skirt several months ago, but only took pictures of it in March. Yes, and I am only now sharing it too. I absolutely love this skirt! It is my favorite one I have made myself and was a very simple project. The fabric as you can see below has a lovely floral print and is a crinkled jersey knit. I only needed a yard to make it. I used this tutorial to complete this skirt. After completing it, there are some things I might do differently, particularly regarding the side seam. Still it is an easy project with beautiful results. By the way, I got the belt with a skirt a bought from Maurices, one of my favorite stores.

My Skirt!