Tuesday, November 19, 2013
New Peek-a-Boo Patterns!!
Hurry over to Peek-a-Boo Patterns! The Comfy Cozy Robe and Slippers have been released! If you purchase them together, you save! Seriously, you can't have the robe without the slippers. ;) And what a perfect Christmas gift! I bought my set! Can't wait to make some matching robes and slippers! I'll be sure to share pics when I do. :) Happy sewing everyone!

Friday, November 15, 2013
The Newsie Cap by Peek-a-Boo Patterns
So last week, Peek-a-Boo patterns started a new Friday tradition: Customer Appreciation Day! Every Friday, the lovely owner of this pattern shop will give away a free pattern to one lucky customer. In order to participate and have a chance at winning a free pattern, you must have made something in the past week using a Peek-a-Boo pattern. How fun is that! Last week, I wasn't able to participate, but this week I am! Yesterday, I made my first Peek-a-Boo Newsie Cap.

Isn't it adorable???? And talk about a fun, quick sew with a perfectly beautiful result! This was my first time working with corduroy and I believe my first time sewing a real hat (at least I think). This pattern is great! It comes with several size options. I made the child size option, which I could almost fit on my head. So maybe the biggest size would be perfect for me??? ;) This hat is meant to be roomy and slouchy. If you are worried about sizing, don't be. The finished circumference of each size is given (and it is accurate), and there is also a formula for making a custom fit band.

This pattern walks you through each step, with clear instructions and pictures. This hat is fully lined! You could use the same color for the lining or you could add a pop of color for a hidden surprise (like I did)!

Don't you love this lining fabric??? This fun apple print makes it the perfect little school girl hat! I have to tell you, I got both of these fabrics at Jo-Ann's one day when the red tag clearance was an additional 50% off. I think I got the apple print for like a $1 something a yard and the corduroy for $3 something.
I finished off the top of my hat with an adorable, large covered button.

Is that just perfect or what??? Even my husband was like "No way! That is so cute!" But don't tell anyone he said that. ;)
I am so pleased with this pattern! I can't wait to make more! This one is going to a special little six year old girl! I want to make some matching ones for my little nieces next. These really are just too adorable! If you haven't already, you used definitely get this pattern! :)
Thursday, November 14, 2013
Ribbons and Bows
Here is another fun project that I completed about two weeks ago.

You might remember that I made these once before and shared them in this post. Several weeks ago, I realized Jo-Ann carries small rolls of grosgrain ribbon for $1. (The purple floral and chevron stripes were small rolls; the purple with teal polka-dots was a regular roll.) I was able to make three bows with the small rolls.
Also around that same time, I found some different shelf liner that was actually about half the thickness of regular shelf liner, yet it works just as good. No slipping at all!

I love making these bows and adding them to gifts! I loved hair bows when I was little, so seriously what little girl wouldn't love them. I mentioned this before, but I found this excellent tutorial here.
I definitely recommend making them! They would make a cute addition to any holiday outfit!
And speaking of holiday outfits! Today is Thursday and you know what that means?!?!?! It is Thrifty Thursday over at Peek-a-Boo patterns! Today's amazing deal is the Elaina Pintuck Party Dress!
Click here to view more details about this dress and its amazing features! Talk about adorable and perfect for Christmas! Grab this pattern up today for only $4 and make some matching no-slip hair bows! Your little lady/ladies will be the bell/bells of the ball! ;) Oh and to sweeten the deal, Peek-a-Boo patterns is also offering a bundle deal for those purchasing this dress along with her bolero pattern!!! Save even more and buy the two together! :)
Wednesday, November 13, 2013
Pillows Here And Pillows There
The other day I shared with you the big project I had completed last week, so today, I thought I would share with you one of my recent smaller projects. I like to have balance in life and in sewing. I like to complete difficult projects to stretch my skills, but I also like to throw in those easier projects so I don't go insane. Sometimes it is just nice to sit back and work on a project that doesn't require as much focus or detail.
Pillow covers are definitely a simple project (yet I think there is or can be an art to making them), but one that I actually enjoy. Don't ask me why. :) And I LOVE how a set of pillow covers can transform a couch. About two and a half weeks ago, I made my mom some pillow covers for her family room couch.
Here is the burgundy couch with its burgundy pillows. I know, lots of burgundy! But let me tell you this is the most comfortable couch in the world! For real!

So with all that burgundy, we decided to add a pop of color.

What do you think? Same comfy couch and pillows with a new splash of color.

I made these covers with a deep envelope closure, which makes for no gaping holes and easy removal. Plus, you can actually wash these covers!

See that nice generous closure? Remember how I said that pillow covers are simple, yet there can be an art to them? Well I was referring to their construction. This pillow cover could be whipped out in 10-15 min, from cut to finish. However, I like to make professional looking pillow covers. Professional pillow covers have finished seams and reinforced tension points. To finish the raw edges of my seams, I used my serger. And to reinforce this pillow cover, I used a triple stitch along both edges.
Now another method for making removable pillow covers is the invisible zipper method. I like this method as well, primarily because both sides of the pillow can be displayed. Several months ago, I made my mom a set of pillow covers with this type of closure for her front living room couch. Here are some before and after pictures of those as well.
This is Ty Pennington home decor fabric that I really got for a steal! I just love the feel and look of this fabric. The flowers have a velvety-like texture.
See how nice this closure is? It really is practically invisible. And the zipper was the perfect blue, which makes the zipper tab even harder to see.
So which pillow cover closure do you prefer?
Pillow covers are definitely a simple project (yet I think there is or can be an art to making them), but one that I actually enjoy. Don't ask me why. :) And I LOVE how a set of pillow covers can transform a couch. About two and a half weeks ago, I made my mom some pillow covers for her family room couch.
Here is the burgundy couch with its burgundy pillows. I know, lots of burgundy! But let me tell you this is the most comfortable couch in the world! For real!

So with all that burgundy, we decided to add a pop of color.

What do you think? Same comfy couch and pillows with a new splash of color.

I made these covers with a deep envelope closure, which makes for no gaping holes and easy removal. Plus, you can actually wash these covers!

See that nice generous closure? Remember how I said that pillow covers are simple, yet there can be an art to them? Well I was referring to their construction. This pillow cover could be whipped out in 10-15 min, from cut to finish. However, I like to make professional looking pillow covers. Professional pillow covers have finished seams and reinforced tension points. To finish the raw edges of my seams, I used my serger. And to reinforce this pillow cover, I used a triple stitch along both edges.
Now another method for making removable pillow covers is the invisible zipper method. I like this method as well, primarily because both sides of the pillow can be displayed. Several months ago, I made my mom a set of pillow covers with this type of closure for her front living room couch. Here are some before and after pictures of those as well.
 |
| Before |
 |
| After |
 |
| Close up |
 |
| Invisible Zipper |
So which pillow cover closure do you prefer?
Monday, November 11, 2013
A Stellar Announcement
*This blog post includes affiliate links
Yesterday, Swoon Sewing Patterns released yet another great pattern to its already marvelous collection of PDF sewing patterns! Let's all give a warm welcome to the Stella Weekender Bag ! As many of you have probably already guessed (due to many blog posts featuring a Swoon project), I really am in love with all things Swoon! This pattern is no exception! I became a Swoon pattern tester about a month ago, my first tester project being the little girl's cardigan. Stella, however, is my first bag to test, so she is extra special!
So without further ado, let me introduce you to Stella (well at least my version of Stella)!
Isn't she amazing??? The evening I finished her, I just sat and stared, hardly believing I had actually made such a bag! Trust me, it wasn't like I just snapped my fingers and presto, there she was! This girl takes work, but as you can see, the end result is kind of worth all that hard work. :)
So what makes Stella so special? Well let's put her under the microscope. Stella is full of some serious interfacing and stabilizer! Her exterior pieces are reinforced with fleece, while her lining pieces are reinforced with a lightweight interfacing. Her handles and bottom are reinforced with Peltex, a seriously wicked stabilizer. Before attaching the lining to the exterior part, I actually snapped a picture of her insides. Poor Stella would be so mortified. ;)
She definitely has plenty of body! Can I be biased and say that my stitching looks pretty darn good, even on the inside?!?!?! :)
On top of excellent structure and form, this girl is fully lined.
She has carrying options. If your hands need a rest, throw her over your shoulder with her removable strap. I added a nice shoulder pad to my Stella, which I purchased from Strapworks.com. This is also where I purchased her strap loops and swivel snaps. Strapworks is the place to buy bag hardware (and straps of course)! Seriously, you won't be able to find better deals!

Another fabulous feature of Stella is all her room! She definitely has enough compartments to hold all you need for a quick weekend getaway or the necessary essentials to carry on your flight in case the worst happens: your luggage fails to make it to your vacation destination. Stella is also the perfect size for a roomy diaper bag. Who says diaper bags can't have style??? I packed my Stella with some perfect weekender/travel essentials just so you could see how roomy this girl is.
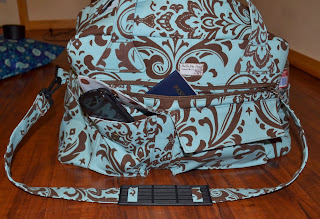

Speaking of room and compartments, does this girl have pockets!!! Stella is the queen of pockets! She has pockets on the outside and pockets on the inside.
She has an exterior zipper pocket,

cargo pockets (my first time making!!!),

open pockets (inside and outside),
and even side pockets.

After such an impressive resume, are you really that surprised by her name? She really is out of this world great!
Now, I must be honest with you. This bag is not a simple project. If you are looking for a quick afternoon project, Stella is NOT your girl. Stella takes time, patience, and determination. My suggestion is to tackle Stella in parts. Spend an afternoon (or two) cutting out all her pieces, another fusing all that interfacing to the fabric, and another (or two) putting her together. Take your time and enjoy the project, keeping a mental picture of the beautiful finished project in your mind. And honestly, if you can get past the cutting and fusing, you've accomplished over half the battle. Putting her together is the fun part! Don't be intimidated! I have only been sewing for a little over a year and look at my Stella! The instructions to this pattern are so clear and detailed, and the accompanying illustrations are an added bonus! You really can do this!
So what are you waiting for??? Go visit Swoon Sewing Patterns today and pick up Stella ! Make yourself a weekender bag that everyone will be talking about! Make one for someone on your Christmas list!
Material Credits:
Exterior fabric (Home Decor)- Premier Prints Traditions French Blue/Brown (purchased on fabric.com)
Interior/lining fabric (Quilting Cotton)- Spot On II Polka Dots White/Brown (purchased on fabric.com
Pellon Products-
Pellon 971F (Fleece)
Pellon 911FF (Lightweight interfacing)
Peltex 71F (Stabilizer)
Hardware and Notions-
Magnetic snaps (cargo pocket closures)-Jo-Ann's
Zippers-purchased from http://www.etsy.com/shop/zipit
Strap loops, swivel snaps, and shoulder pad-purchased from strapworks.com
Yesterday, Swoon Sewing Patterns released yet another great pattern to its already marvelous collection of PDF sewing patterns! Let's all give a warm welcome to the Stella Weekender Bag ! As many of you have probably already guessed (due to many blog posts featuring a Swoon project), I really am in love with all things Swoon! This pattern is no exception! I became a Swoon pattern tester about a month ago, my first tester project being the little girl's cardigan. Stella, however, is my first bag to test, so she is extra special!
So without further ado, let me introduce you to Stella (well at least my version of Stella)!
 |
| Front Pic |
 |
| Back Pic |
Isn't she amazing??? The evening I finished her, I just sat and stared, hardly believing I had actually made such a bag! Trust me, it wasn't like I just snapped my fingers and presto, there she was! This girl takes work, but as you can see, the end result is kind of worth all that hard work. :)
So what makes Stella so special? Well let's put her under the microscope. Stella is full of some serious interfacing and stabilizer! Her exterior pieces are reinforced with fleece, while her lining pieces are reinforced with a lightweight interfacing. Her handles and bottom are reinforced with Peltex, a seriously wicked stabilizer. Before attaching the lining to the exterior part, I actually snapped a picture of her insides. Poor Stella would be so mortified. ;)
 |
She definitely has plenty of body! Can I be biased and say that my stitching looks pretty darn good, even on the inside?!?!?! :)
On top of excellent structure and form, this girl is fully lined.
 |
| I LOVE the chocolate polka dots! |
She has carrying options. If your hands need a rest, throw her over your shoulder with her removable strap. I added a nice shoulder pad to my Stella, which I purchased from Strapworks.com. This is also where I purchased her strap loops and swivel snaps. Strapworks is the place to buy bag hardware (and straps of course)! Seriously, you won't be able to find better deals!

Another fabulous feature of Stella is all her room! She definitely has enough compartments to hold all you need for a quick weekend getaway or the necessary essentials to carry on your flight in case the worst happens: your luggage fails to make it to your vacation destination. Stella is also the perfect size for a roomy diaper bag. Who says diaper bags can't have style??? I packed my Stella with some perfect weekender/travel essentials just so you could see how roomy this girl is.


Speaking of room and compartments, does this girl have pockets!!! Stella is the queen of pockets! She has pockets on the outside and pockets on the inside.
She has an exterior zipper pocket,

cargo pockets (my first time making!!!),

open pockets (inside and outside),
 |
| Inside Open Pockets |
 |
| Outside Open Pockets |
and even side pockets.

After such an impressive resume, are you really that surprised by her name? She really is out of this world great!
Now, I must be honest with you. This bag is not a simple project. If you are looking for a quick afternoon project, Stella is NOT your girl. Stella takes time, patience, and determination. My suggestion is to tackle Stella in parts. Spend an afternoon (or two) cutting out all her pieces, another fusing all that interfacing to the fabric, and another (or two) putting her together. Take your time and enjoy the project, keeping a mental picture of the beautiful finished project in your mind. And honestly, if you can get past the cutting and fusing, you've accomplished over half the battle. Putting her together is the fun part! Don't be intimidated! I have only been sewing for a little over a year and look at my Stella! The instructions to this pattern are so clear and detailed, and the accompanying illustrations are an added bonus! You really can do this!
So what are you waiting for??? Go visit Swoon Sewing Patterns today and pick up Stella ! Make yourself a weekender bag that everyone will be talking about! Make one for someone on your Christmas list!
Material Credits:
Exterior fabric (Home Decor)- Premier Prints Traditions French Blue/Brown (purchased on fabric.com)
Interior/lining fabric (Quilting Cotton)- Spot On II Polka Dots White/Brown (purchased on fabric.com
Pellon Products-
Pellon 971F (Fleece)
Pellon 911FF (Lightweight interfacing)
Peltex 71F (Stabilizer)
Hardware and Notions-
Magnetic snaps (cargo pocket closures)-Jo-Ann's
Zippers-purchased from http://www.etsy.com/shop/zipit
Strap loops, swivel snaps, and shoulder pad-purchased from strapworks.com
Tuesday, October 29, 2013
Newly Updated Peek-a-Boo Pattern!!!
*This blog post includes affiliate links
Today, Peek-a-Boo Patterns released the newly updated Perfect Peasant Dress pattern, which goes up to size 12! Click here to view more details! Though I have many Peek-a-Boo patterns, I somehow missed this one!! It is adorable! I just purchased it! Be sure to check it out! I can't wait to make one!
Today, Peek-a-Boo Patterns released the newly updated Perfect Peasant Dress pattern, which goes up to size 12! Click here to view more details! Though I have many Peek-a-Boo patterns, I somehow missed this one!! It is adorable! I just purchased it! Be sure to check it out! I can't wait to make one!
Wednesday, October 23, 2013
The Long Awaited, Much Anticipated Rosie!!
*This blog post includes affiliate links
So you know how I was hopeful Monday that I would have pics of my completed Rosie up? Alas, our best laid plans do not always come to fruition. But better late than never! :) Here she is....
Do you see what I see? Let's play a game! I spy with my little eye something that is pink...green...or sometimes blue! Did you guess???? If you said owls, you won! Haha remember when I talked about my newest owl fad here??? I did warn you. ;)
This fabric combo (colorful owls/sparkly denim) is probably more teen friendly than sophisticated young adult... (who is calling who sophisticated???) Well good thing I am a fun young adult.... Although I am almost 28, practically pushing 30, so does that mean I am not a young adult anymore??? Ah! Please, let's not think about that anymore than we have too....
Look at how perfect that top stitching looks??? And those curves!! Why they are practically perfect! Let me have my bragging moment, for now...
"Please excuse my slightly wrinkled look! I have just been turned outside in or right side out! And the person sewing me only gave me a 4-inch gap to slip through, instead of the recommended 5-inch," says disgruntled purse.
Speaking of zippers..... Can I say NIGHTMARE???? Ugh! So yes, the inside zipper looks pretty good right? Well the outside zipper is non-existent!!! You know why??? Because we had a falling out after the third time of ripping out stitches! This should not in anyway reflect negatively on the quality of this lovely pattern! Rather, it is a reflection of my poor choice to use this STRETCH denim fabric, STRETCH being the key word. First, I have never sewn with denim and this was pretty thick stuff! Secondly, the stretching quality is horrible when trying to install a zipper. The rectangular cutout kept stretching and because the fabric was so thick (plus the fleece), it was difficult to get the cut pieces to fold evenly. Let's just say, I learned my lesson about using stretch fabric for purse making. It just doesn't work or I am just that bad. Seriously, though, I always struggle somewhat with keeping a zipper aligned and not having my rectangle look slightly off. Any advice from you zipper pros? How do you keep zippers from moving? Any tricks?
So, you are probably wondering what happened to the outside zipper pocket, since, yes, I had already cut it out. I could have just cut another piece but I was stubborn and had already cut the pocket pieces. So.....I just stitched around the pocket square without the zipper and I attached the pocket pieces the same way it says to with the zipper, except on the remaining part of the raw edges of the cutout pocket edges. That probably sounds confusing, so I will just show you. Just don't laugh.
Okay, this picture even shows how my rectangle slot is kind of wonky...Stretch fabric people, stretch fabric! But on the bright side, I sort of thought the peeking owls were cute... :) Haha, a lesson well learned.
Despite my zipper trials, I love my first little Rosie! It has character! I can't wait to make my next one! I already have my (non-stretch) fabric choice picked out! The fabric choice will be less thick (because this denim was too thick) and more elegant for a sophisticated young adult....or middle-aged adult...No, I am too young for that! ;)
As to my review of this pattern, let me just say the Rosie Crossbody Bag is wonderful, like every Swoon Sewing Pattern I have tried so far!!! The directions are so clear and I love how the wonderful designer divides the process into sections of the bag, rather than every little step. Sometimes, it can feel so overwhelming to look at 21-30 steps! It is so much more comforting to see instructions broken into....say 9 steps! Much more manageable and psychologically friendlier to look at. :) The accompanying illustrations are also so helpful, especially for those of you that are more visual or for those of you that are doing something for the first time. For me, it was attaching a strap slide. The diagram was so easy to follow! This bag is perfect; smaller than the Eleanor Slouchy Hobo bag which I showed you a picture of in this post, making it a perfect purse for the times when you just want something smaller to carry all your junk....I mean essentials in. ;) Don't get me wrong; it is still nice and roomy! It also has a different style...more structured, less slouchy. Seriously, every girl needs a different purse to compliment her different styles or moods. I love the magnetic closure and the flap! I was really worried about getting the contrasting flap piece perfectly centered but there was no need to worry! I just followed the directions to a T and it came out perfectly! I highly recommend this little lady!!!
Here is one last pic....forgive my unsophisticated dress.

Well that's a Rosie Wrap! :)
So you know how I was hopeful Monday that I would have pics of my completed Rosie up? Alas, our best laid plans do not always come to fruition. But better late than never! :) Here she is....
 |
| Just Hangin' Around |
Do you see what I see? Let's play a game! I spy with my little eye something that is pink...green...or sometimes blue! Did you guess???? If you said owls, you won! Haha remember when I talked about my newest owl fad here??? I did warn you. ;)
 | |
| Just Posing With the Flowers |
This fabric combo (colorful owls/sparkly denim) is probably more teen friendly than sophisticated young adult... (who is calling who sophisticated???) Well good thing I am a fun young adult.... Although I am almost 28, practically pushing 30, so does that mean I am not a young adult anymore??? Ah! Please, let's not think about that anymore than we have too....
 |
| Just Posing alone....what a poser!! ;) |
 |
| Just Posing with the Top Down |
"Please excuse my slightly wrinkled look! I have just been turned outside in or right side out! And the person sewing me only gave me a 4-inch gap to slip through, instead of the recommended 5-inch," says disgruntled purse.
 |
| Just showing off my inside zipper. |
Speaking of zippers..... Can I say NIGHTMARE???? Ugh! So yes, the inside zipper looks pretty good right? Well the outside zipper is non-existent!!! You know why??? Because we had a falling out after the third time of ripping out stitches! This should not in anyway reflect negatively on the quality of this lovely pattern! Rather, it is a reflection of my poor choice to use this STRETCH denim fabric, STRETCH being the key word. First, I have never sewn with denim and this was pretty thick stuff! Secondly, the stretching quality is horrible when trying to install a zipper. The rectangular cutout kept stretching and because the fabric was so thick (plus the fleece), it was difficult to get the cut pieces to fold evenly. Let's just say, I learned my lesson about using stretch fabric for purse making. It just doesn't work or I am just that bad. Seriously, though, I always struggle somewhat with keeping a zipper aligned and not having my rectangle look slightly off. Any advice from you zipper pros? How do you keep zippers from moving? Any tricks?
So, you are probably wondering what happened to the outside zipper pocket, since, yes, I had already cut it out. I could have just cut another piece but I was stubborn and had already cut the pocket pieces. So.....I just stitched around the pocket square without the zipper and I attached the pocket pieces the same way it says to with the zipper, except on the remaining part of the raw edges of the cutout pocket edges. That probably sounds confusing, so I will just show you. Just don't laugh.
 |
| Just Posing with my Peeking Pocket |
Okay, this picture even shows how my rectangle slot is kind of wonky...Stretch fabric people, stretch fabric! But on the bright side, I sort of thought the peeking owls were cute... :) Haha, a lesson well learned.
Despite my zipper trials, I love my first little Rosie! It has character! I can't wait to make my next one! I already have my (non-stretch) fabric choice picked out! The fabric choice will be less thick (because this denim was too thick) and more elegant for a sophisticated young adult....or middle-aged adult...No, I am too young for that! ;)
As to my review of this pattern, let me just say the Rosie Crossbody Bag is wonderful, like every Swoon Sewing Pattern I have tried so far!!! The directions are so clear and I love how the wonderful designer divides the process into sections of the bag, rather than every little step. Sometimes, it can feel so overwhelming to look at 21-30 steps! It is so much more comforting to see instructions broken into....say 9 steps! Much more manageable and psychologically friendlier to look at. :) The accompanying illustrations are also so helpful, especially for those of you that are more visual or for those of you that are doing something for the first time. For me, it was attaching a strap slide. The diagram was so easy to follow! This bag is perfect; smaller than the Eleanor Slouchy Hobo bag which I showed you a picture of in this post, making it a perfect purse for the times when you just want something smaller to carry all your junk....I mean essentials in. ;) Don't get me wrong; it is still nice and roomy! It also has a different style...more structured, less slouchy. Seriously, every girl needs a different purse to compliment her different styles or moods. I love the magnetic closure and the flap! I was really worried about getting the contrasting flap piece perfectly centered but there was no need to worry! I just followed the directions to a T and it came out perfectly! I highly recommend this little lady!!!
Here is one last pic....forgive my unsophisticated dress.

Well that's a Rosie Wrap! :)
Subscribe to:
Posts (Atom)