Friday, October 26, 2012

My Early Birthday Surprise! :)

Have I ever said my husband is wonderful?!?! Well he is and I should say it more often! He is wonderful for so many reasons, but right now, I want to acknowledge how wonderful he is for getting me my very own sewing machine as an early (a month early) birthday present! As I have said in past posts, I have been borrowing my mom's old Singer sewing machine. Now, thanks to my wonderful husband, I am the proud owner of a Singer 9960 Quantum Stylist. I was so excited when it arrived Tuesday night! I spent the whole evening reading the manual, just itching to sew something with it. I attempted my first project the next morning: these adorable baby Mary Jane shoes. (I promise to post pictures later of these adorable little creations.) The machine sewed like a dream. It does so many wonderful things! I think it will take me years to fully appreciate each of the 600 stitches and all the cool features. I can't wait to show you what I made on it last night (and finished today), but that will have to stay a surprise until another post. This post is about my wonderful husband! :)


There is Mr. Wonderful all ready for his game.

And of course, me with Mr. Wonderful!
 Click below to take a look at my baby, but beware, you might want one for yourself. 

SINGER 9960 Quantum Stylist 600-Stitch Computerized Sewing Machine

Friday, October 19, 2012

Cozy & Simple Baby Booties

I found the easiest pattern here to make little baby booties with three seams. You can make a set using one fabric quarter and still have fabric left over! Sorry, I didn't take pictures as I went along; however, the pattern provides pictures. I have made two pairs so far. Here is a picture of the first set I made.

These are the 3 to 6 month size.

Aren't they adorable? The only part I had trouble with was the third and final seem. The pattern calls for a zigzag stitch that goes off the right edge. I had trouble making sure both pieces were stitched, so there were no gaps. I probably just needed to cut better or line the pieces up better. It was easy to fix though. For the next pair I make, I might just stitch close to the edge but not off, and then trim some of the excess.

I made these little darlings for my youngest niece, Rihanna Rose.

Baby Feet = Adorable!
A perfect fit! I promise that I will take step-by-step pictures of the next pair I make. I am thinking about adding some cute buttons to the top. Also, I want to extend the size and make slipper booties for Hannah, Rihanna's big sissy.

Tuesday, October 9, 2012

The Ariel Dress (Second Installment)

I must apologize for my delay in returning to the Ariel dress. First, I successfully finished it, invisible zipper and all. Second, my niece loved it and she looked adorable in it at her second birthday party. In the first segment I wrote on the Ariel dress, I showed how I made a lining for the dress and how I attached to the dress.  In this post I will share with you the completion of the dress, which included installing the invisible zipper, sewing up the back seam, adding a hook and eye clasp, and attaching the ribbon straps. I did not finish this all at once. I tackled the invisible zipper on a Saturday, along with sewing up the back seam. Then the next Sunday, I attached the ribbon straps. However, I had to reposition the straps after trying the dress on my niece (the straps were spaced too far apart that they fell off her shoulders). I added the clasp and eye hook when I repositioned the straps.

So installing the zipper...... On the afternoon I finally attempted to install the invisible zipper onto the Ariel dress, I realized there was no way I could use the zipper foot I had bought at Jo-Ann's. For some reason, I failed to notice that it was a Vertical zipper foot (this was written clearly across the top). I still really do not understand what a vertical zipper foot is and if I can even use it on my machine but that is for another day. After doing some online searching about zipper foots and installing zippers, I came up with this bright idea to use a regular foot. Some people online said that it was possible to do. Well after breaking my first needle (which thankful I had spares), I successful got the invisible zipper installed.

Pinning the first strip of the zipper.

Beginning my attempt to attach an invisible zipper with a regular foot...before the needle broke.

One side finished...Can you tell that I sewed as close to the teeth as I could?
Complete!

Practically invisible. :)

Sewing up the back seam.
Back seam completed!

Here are what the straps looked like after the first attempt.


Here is what they looked like after I repositioned them. On a side note, I do not recommend using this type of ribbon. It unraveled horribly and I really had to reinforce the stitches in order to keep them from continuing to unravel. I recommend plain ribbon or material. Still they were adorable.


Here is the clasp!

Here is the finished product on the birthday girl!


This was a fun project for me as a beginner. I learned some great skills, such as hemming, gather, and inserting an invisible zipper. Stay posted as I begin to share more about the projects I have completed since this.


Wednesday, September 5, 2012

How Many Times Can I Go to Jo-Ann's???

Well, I did it again. I went to Jo-Ann's, but remember I had to use my 30%-off-entire-purchase card between September 4th through the 8th. Today was the 5th, so I did wait a whole day to go. I should get some points for that. :) I found so many different materials that I really loved and so much of my purchase was this, from denim to some wild pink with black zebra stripes. Someone asked me if I was making a quilt with all the fabric, and I thought they must have thought I was crazy if they thought I was going to put my very diverse fabric together in a quilt. I let them know I had no idea what I would make with them but that they would eventually be used on some different projects. I also bought some yarn and a circular knitting needle that I need to make an adorable knit cardigan for my tiny little niece, the little newborn sister of my Ariel-fan-niece.

Tonight, my husband and I had dinner at his parents' house. His aunt and uncle from Wisconsin were there and I got to enjoy a long and educational sewing chat with his aunt who has been sewing since she was young. She made her own prom dress in high school! Seriously, how many people can say that? I am lucky to have two excellent sewing resources, my husband's mom and his aunt!

Hopefully, I will have some project posts later this week, which has been very busy.

Saturday, September 1, 2012

A Moment to Laugh

Today, my husband had one of his rare days off, which are always a treat for us both! Being the wonderful sport he is, he graciously spent some of this afternoon helping me cut out material using the new tools I bought yesterday. At one point he mentioned that it might be more helpful to iron the material first because it had several creases where it had been folded. I agreed and instantly remembered the iron we had been given for a wedding gift (one we had never used yet, during our first year of marriage). So we hopped up and headed to the closest where we have several wonderful gifts stored that we just do not have the room to put out in our apartment. Excited we sat down to open our iron. As soon as my husband opened the box, he knew something was wrong. The first warning sign was the wedding tissue paper laying inside. "Strange," I thought to myself. Then, my husband pulled out the table runner that was wrapped in the tissue paper. We both looked at each other, thinking the same thing. He pulled out the last item, which was a vase. We just stared at them both for a moment, recovering from the shock of seeing our "iron." We laughed a little, thinking it was funny we had thought we had one gift for a whole year and it turned out to be something entirely different. That is when it hit me: "Honey, our thank you card said 'thank you for the iron'!!!" We died laughing, half embarrassed and half entertained. Now how many people can say they thanked a couple for the box they received their wedding gift in? Maybe more than I would guess. See, sewing can leave you in stitches. ;)

Friday, August 31, 2012

To Jo-Ann's I Went...

Is it bad that I went to Jo-Ann's for the third time since Sunday? Maybe....maybe not. After all, it is National Sewing Month and they have had wonderful sales for someone like me who is just building their collection of necessary sewing tools. Today, I HAD to go there, because if you spend $35 or more today through Monday, you will receive a card that is good for 30% off an entire purchase, including sale and clearance items! Seriously, can you blame me for going? Of course, I have to use this card between the 4th and the 8th of next month, so I suppose I will be forced to go to Jo-Ann's again next week. Alas....life is rough. :)

Today I expanded my tools to include a rotary cutting set, a chalk pen, a tracing wheel, an acrylic ruler, and a sewing gauge. No, it is not by chance that all but two of the tools I purchased today are used to cut fabric. Yes, all fabric cutting tools, minus like three items, were 40% off. Hurray for Jo-Ann's and National Sewing Month!!!

Thursday, August 30, 2012

The Ariel Dress (First Installment)

As I said, I want to share my sewing adventures here, whether big or small, crazy or sane. :) Yesterday, I started working on my niece's dress that she is going to wear for her birthday party next month. As I mentioned in my last post, she is in love with Ariel (The Little Mermaid)! So my sister-in-law is throwing her an Ariel themed birthday party. Here is an account of yesterday's endeavors. 

I have had the material for the dress since the beginning of this month, when Jo-Ann's was having a wonderful sale. (I will not admit to how much I spent that day....but I did save a lot!) Now this material is definitely for beginners. It is the pre-shirred fabric from Jo-Ann's, so honestly you could sew up the back seam and attach ribbons for straps and have a dress in no time. But I wanted to put more into it, so I also purchased some white muslin to make a lining. The first thing I did yesterday was cut the material down to size. I had already measured my niece the day before, so I was good to go. It is really easy to cut the pre-shirred fabric down, as I learned from the lovely lady at Jo-Ann's. Once you cut through the pre-shirred portion, all you have to do is tear the rest of the material and it follows the grain line leaving you with a perfect cut! Unfortunately, I had to measure the muslin and use a ruler and pencil to make certain that I cut straight. To figure out how long I should make it, I measured the length and width of the dress material from the longest portion to the start of the pre-shirred bodice. I cut it one inch shorter than the dress material because I wanted to ensure the lining would not peak out under the dress.

After the cutting, it was time to hem the lining. So I needed my ruler and pin cushion.

Pinning the Lining to Hem

 Next, I measured across to make sure I had hemmed the lining evenly. Thankful, my precision paid off!


After the pinning, it was time to sew the hem in place. Just had to watch out for the pins as I went. :)


I was very surprised at how straight my sewing turned out! Much improvement!


Hemming the garment seemed like a breeze compared to what lay ahead.....creating gathers so that it would match the gathers in the dress material. I pulled out my handy Sewing guides and read through the steps. I was a bit confused at first but finally, I figured it out.

My Survival Guide

I loosened the thread tension and increased the stitch length on the machine and I stitched two different rows across the top of the lining: the first row 5/8 of an inch from the raw edge and the second in the seam allowance, 1/4 of an inch above the first line. Like how I threw out those sewing terms??? Seam allowances and raw edges! Just some of the new vocabulary I am picking up. :)

Now when sewing gathering stitches, remember not to reinforce the stitches at the beginning or end of the row as you would with a normal stitch. My survival guide did not exactly say this, but since you will be pulling the bobbin thread to create the gathers, it only makes sense. One thing the guide did suggest was to use a different color of thread for the bobbin so it will make it easier to see which thread is which. This was great advice!


So starting at one end and working towards the middle, then doing the same at the other end, I pulled the bobbin threads and moved the material together to form gathers. Before finishing, I laid the lining on top of the dress material to see how much gathering I needed to do to match. Once I had the gathers pretty evenly dispersed, I secured them with pins.


Finally I went back to the sewing machine and sewed the gathers in place right below the first set of loose gathering stitches made. Then I sat down and used my seam ripper to pull out the gathering stitches. I think it turned out pretty good for my first attempt at gathering! :)


Nearing the end of my work for the day, it was time to attach the lining to the dress material. So first I pinned the lining to the wrong side of the dress material, making sure I pinned it just above the first seam line of the pre-sheered bodice.


Once it was successfully pinned, I sewed the two pieces together, with the right side of the dress material facing up, so I could hide the stitches in the first seam line of the bodice. It turned out pretty good.

Lining Secured!

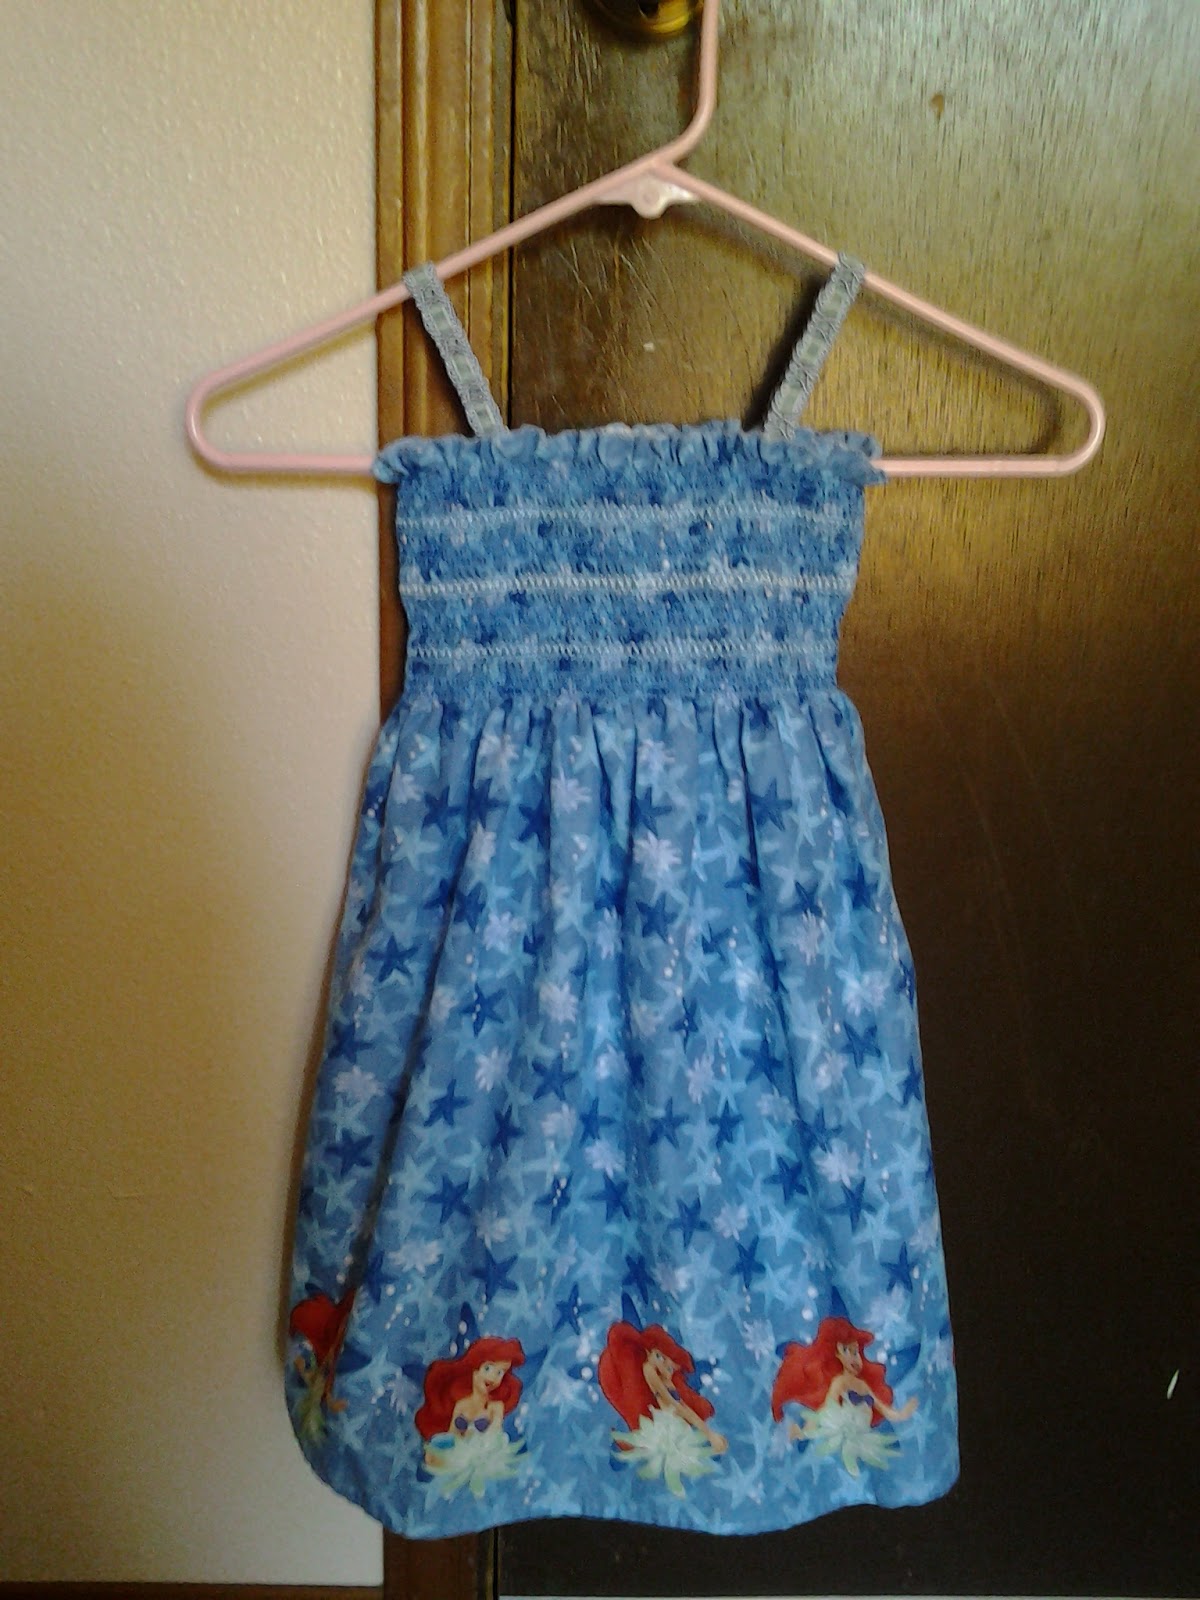
A glimpse of it's future...

All in all, I felt it was a successful day for a newbie sewer like myself. Next, my job will be to find an invisible zipper that matches the color of the dress and learn how to insert it. And I thought gathers would be difficult...... Stay tuned!

Let's Get Stitchin'

This summer, I rekindled my passion for crafting. After five and a half years and a Bachelor's degree and twenty-one Grad credits later, I have finally picked up my crocheting and knitting needles once again. Not to say that I have not touched them at all in the past five and a half years; however, this time I picked them up in earnest, determined to stretch my skills and learn new stitches. Just a few week's ago, I used double pointed knitting needles for the first time and made a super cute hat. I also learned how to do a cable stitch.....something I had not dared to attempt in the past, and I must say, cable stitching is much less daunting than it sounds. :)

With this renewed love and interest in creating, I felt the pull to learn how to sew....to really do it, not just want to! Up until this summer, my dealings with a needle and thread  have consisted of a little sewing box with needles, threads, and a thimble that my parents gave me when I was around ten and sewing a few buttons and pieces of scrap material by hand to make my barbies some "outfits". In June on my book reviewing blog Across the Pages, I mentioned that I was reading Sewing Basics: All You Need to Know About Machine and Hand Sewing by Sandra Bardwell. This was the start of it all. I religiously poured over the first few chapters of this book, but not having a sewing machine made it a bit difficult for me to put to practice what I was reading. And I am one of those individuals who learns best reading and doing simultaneously. Well this last week, last Saturday to be exact, my mom let me take her old Singer sewing machine home. I have gone sewing crazy since. It started with a simple little pillow case and went to my first attempt to make my almost two-year-old niece an Ariel dress for her second birthday. (She is Ariel's biggest fan!) In between these projects, I made two trips to Jo-Ann's to add to my slowly growing sewing supply (try saying that fast three times!). During one of my trips, I bought another book on sewing called The Complete Guide to Sewing. I love this book for many reasons, including the large pictures that accompany the instructions and the index at the back of the book that makes it easy to quickly find instructions for a specific stitch. Yesterday, the book successfully got me through my first attempt at sewing gathers. I felt very accomplished. :)

Anyways, I will get to the point of this blog. I decided a few days ago that I wanted a place where I could journal about my adventures of learning to sew, which led me to blogging. Though at first this blog will mainly be a series of posts on my sewing discoveries, I eventually want this to be a blog where I can share the different projects I am working on, whether they involve sewing, crocheting, or knitting. I titled this blog "In Stitches and Stitches" for two reasons. First, I sometimes feel over my head with all the stitches there are to learn, whether one is sewing, crocheting, or knitting. Second, I felt it was a fun play on words, because with all this stitching I am bound to break out in stitches and stitches of laughter. So you are welcome to join me "In Stitches and Stitches" of laughter as I create and sometimes have to recreate with stitches of all kinds! :)